Brow Shaping Made Simple: Frame Your Face with Ease
Brow shaping made simple: master mapping, find your ideal arch for every face shape, and learn easy trimming, tweezing, and maintenance tips.
Face-Framing Fundamentals — Great brows do more than sit above your eyes; they subtly shape your entire expression. Think of them as the picture frame that makes the artwork pop. When you emphasize balance, proportion, and a gentle arch, your features look more lifted and harmonious. Start by observing your natural growth pattern and density. Do your hairs lie flat or stand up? Is your tail full or sparse? These clues guide your approach. Avoid chasing extreme trends; instead, work with your existing brow shape to enhance your face shape. A soft, fuller front that gradually tapers toward the tail keeps things refined. Good lighting and a magnifying mirror help you make precise choices. Remember, a millimeter matters: removing fewer hairs often yields the most polished result. With a light hand and a clear plan, you can create brows that open the eyes, balance the forehead, and bring effortless symmetry to your look.
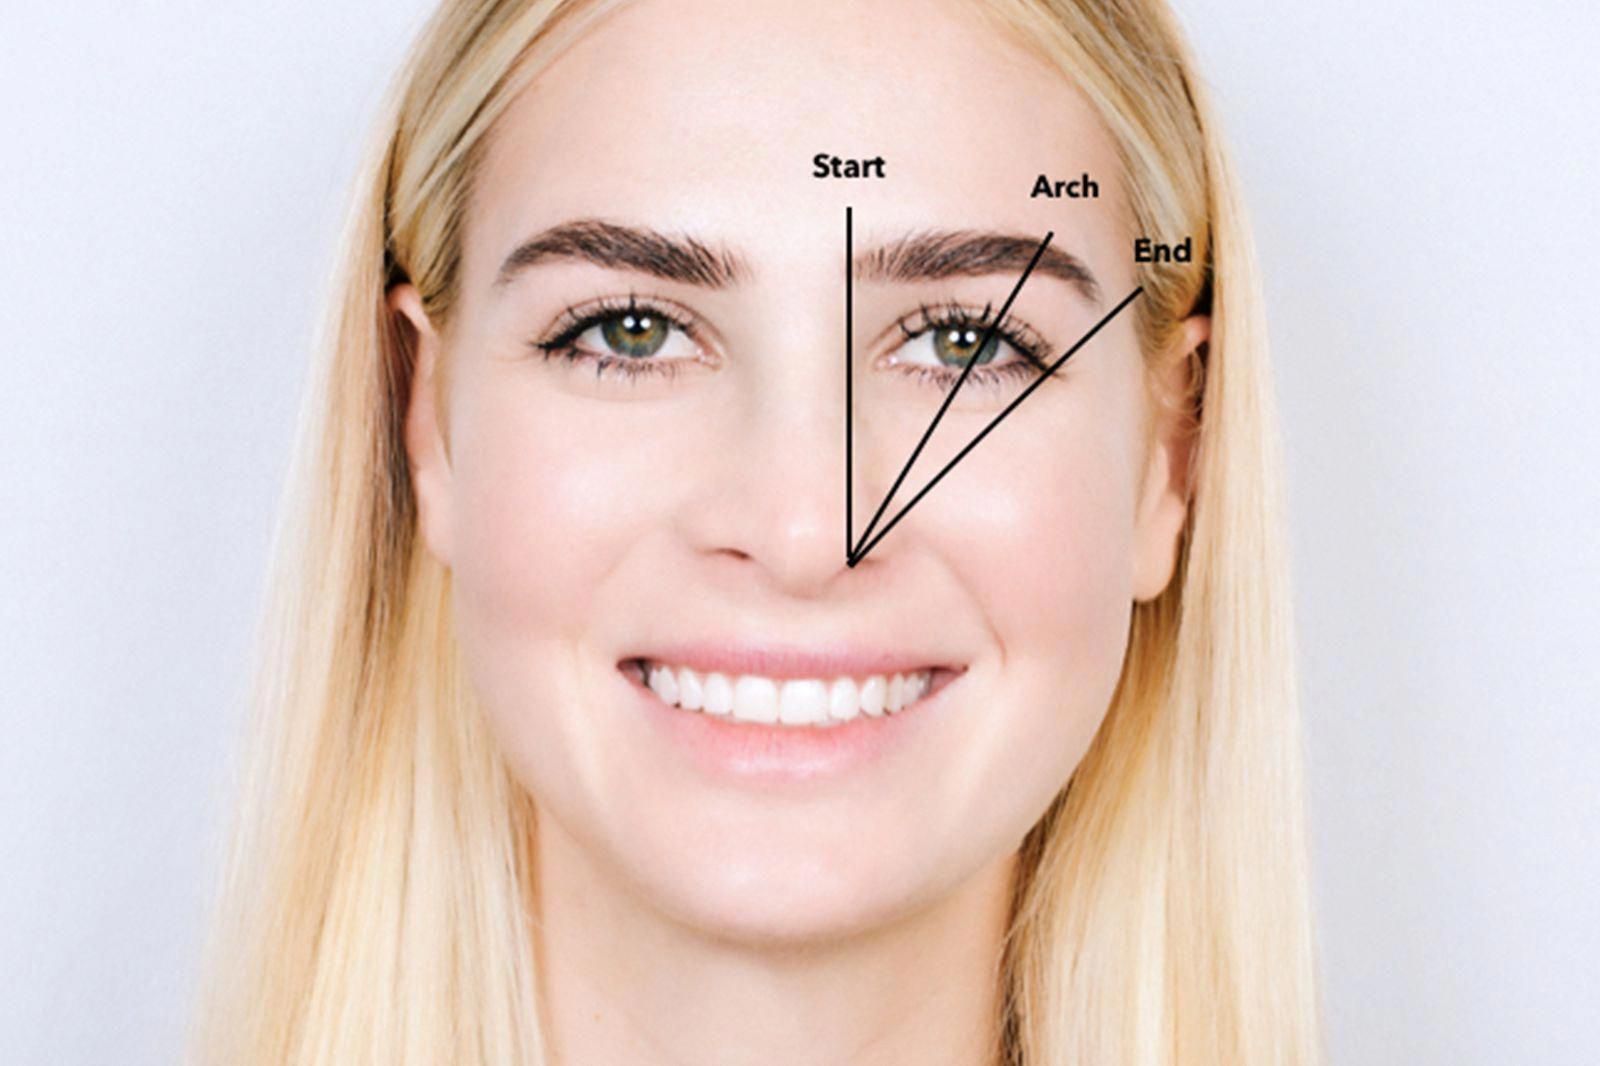
Brow Mapping Made Easy — Before any tweezing or trimming, define your guideposts with simple brow mapping. Use a pencil or thin brush as a straight edge. Your start point aligns from the outer side of the nostril straight up to the inner brow; this prevents a gap that makes the nose look wider. The arch point lines up from the nostril through the center of the iris when you're looking straight ahead; this sets lift without looking surprised. The end point aligns from the nostril to the outer corner of the eye; extending beyond can drag the eye down. Lightly sketch these markers with a white pencil so you can adjust without commitment. Comb hairs upward with a spoolie to see the true outline, then step back and check symmetry. Small natural differences are normal; aim for sisters, not twins. This quick blueprint ensures structure, helps avoid over-plucking, and gives you a clear path to tidy, flattering brows.
Choosing Your Ideal Shape — Tailor your shape to your face shape, features, and hair texture. For a round face, a slightly higher arch can add vertical lift and create definition. With a square face, soften angles using a gentle curve and a less severe peak. A heart shape benefits from a rounded arch and a slightly fuller beginning to balance a narrower chin. Oval faces often suit a classic, softly angled brow that follows natural growth. A long face may look more balanced with a straighter brow and minimal arch to visually shorten the length. Consider hair density: coarse, dark hairs can look bold quickly, so keep edges delicate; fine, light hairs may need extra fullness to register on the face. Respect your natural tail direction and thickness for a believable result. Work in small adjustments over time; a few well-chosen strokes and hairs make a bigger difference than drastic changes, maintaining authenticity and facial harmony.
Tweeze, Trim, or Wax — Choose your method based on comfort and control. Tweezing offers precision: sanitize tweezers, stretch the skin taut, and remove hairs in the direction of growth to minimize breakage. Pull one at a time from beneath the brow, never the top line, to preserve structure. Trimming keeps bulk in check: brush hairs upward with a spoolie, then lightly snip only the tips that cross your desired outline using small, curved scissors. If you try waxing, patch-test, maintain small sections, and avoid the delicate front of the brow where a single strip can remove too much. Threading is excellent for crisp edges and sensitive skin, but technique matters—consider a professional if you're new. Calm the area with aloe or a fragrance-free gel and avoid applying heavy makeup immediately after. The golden rule: remove less than you think, reassess in natural light, and keep the brow's natural architecture intact.
Filling and Defining — Strategic filling enhances shape without looking painted on. Choose your product by desired effect: a pencil creates hairlike strokes, powder gives soft shadow, pomade adds bolder structure, and gel (clear or tinted) boosts lift and hold. Start by sketching feathery microstrokes in the direction of hair growth, focusing on the tail and sparse areas. Use a light hand at the front; a strong block here can flatten the face. Softly underline the lower edge with a pencil to define the shape, then blend with a spoolie to diffuse harsh lines. Press a touch of highlighter or a matte skin-tone shadow just beneath the arch for subtle lift. Finish with tinted gel to add dimension and keep texture visible. If you overdo it, buff with the spoolie; the goal is believable fullness, not perfection. Layer slowly—build color and structure in passes rather than in a single stroke.
Color, Texture, and Growth — Matching shade and texture elevates realism. Aim for a shade one to two tones lighter than very dark hair or one to two tones deeper than very light hair. Consider undertone: ashy brows pair best with cool hues, while warm hair suits caramel or soft brown. Keep texture visible by letting some skin peek through; this prevents a stamped-on look. For growth support, be consistent: avoid over-plucking, reduce aggressive scrubbing, and brush with a spoolie to train hairs upward. Nourish the area with a lightweight conditioning oil or serum if your skin tolerates it—always patch test first. Gentle exfoliation around, not on, the brows keeps follicles clear, and sleeping on a satin pillowcase can reduce friction. If your brows are sparse, focus on careful filling while you wait for regrowth cycles. Patience pays off; small daily habits and minimal trauma encourage fuller, healthier-looking brows over time.
Maintenance and Mistakes to Avoid — A sustainable routine keeps brows polished with minimal effort. Do tiny touch-ups every couple of weeks: remove obvious strays beneath the brow and between the eyes, then stop. Daily, sweep a spoolie through to lift hairs and reset shape; a quick pass of clear gel can lock everything in place. Avoid common pitfalls: over-trimming the front, carving the top line, or chasing extreme trends that fight your natural structure. If you struggle with symmetry, outline lightly with a pencil before any removal and step back frequently. Take photographs in natural light to spot uneven tails or mismatched arches. Keep a simple kit: tweezers, spoolie, small scissors, a precise pencil, and gel. Remember that brows are part of a whole; coordinate intensity with your eye makeup and lip color for balance. Consistency, restraint, and respect for your natural growth pattern make maintenance truly effortless.